
Audio redaction with Secure Redact
Automatically detect PII and generate a transcript, then use both to selectively redact audio in your video or audio files.
When uploading the video/audio file, click to auto-detect Transcribe to generate a transcript.
Choose to translate your audio into English from Arabic, Bulgarian, Farsi, Finnish, French, German, Hindi, Hungarian, Italian, Japanese, Lithuanian, Mandarin, Polish, Portuguese, Punjabi, Romanian, Spanish, Swedish, Thai, Turkish, Ukrainian, Urdu, Welsh
Once it is Ready for review, click the file to open it. The transcription shows all conversations said throughout the video/audio file, alongside a timestamp of when they were said. Hover on the seconds to play that particular phrase.
For a video, click Transcript (right) to open your automatically generated transcription.
Click Audio only in the Audio Timeline to use the Audio Editor in full-size mode (as shown below).
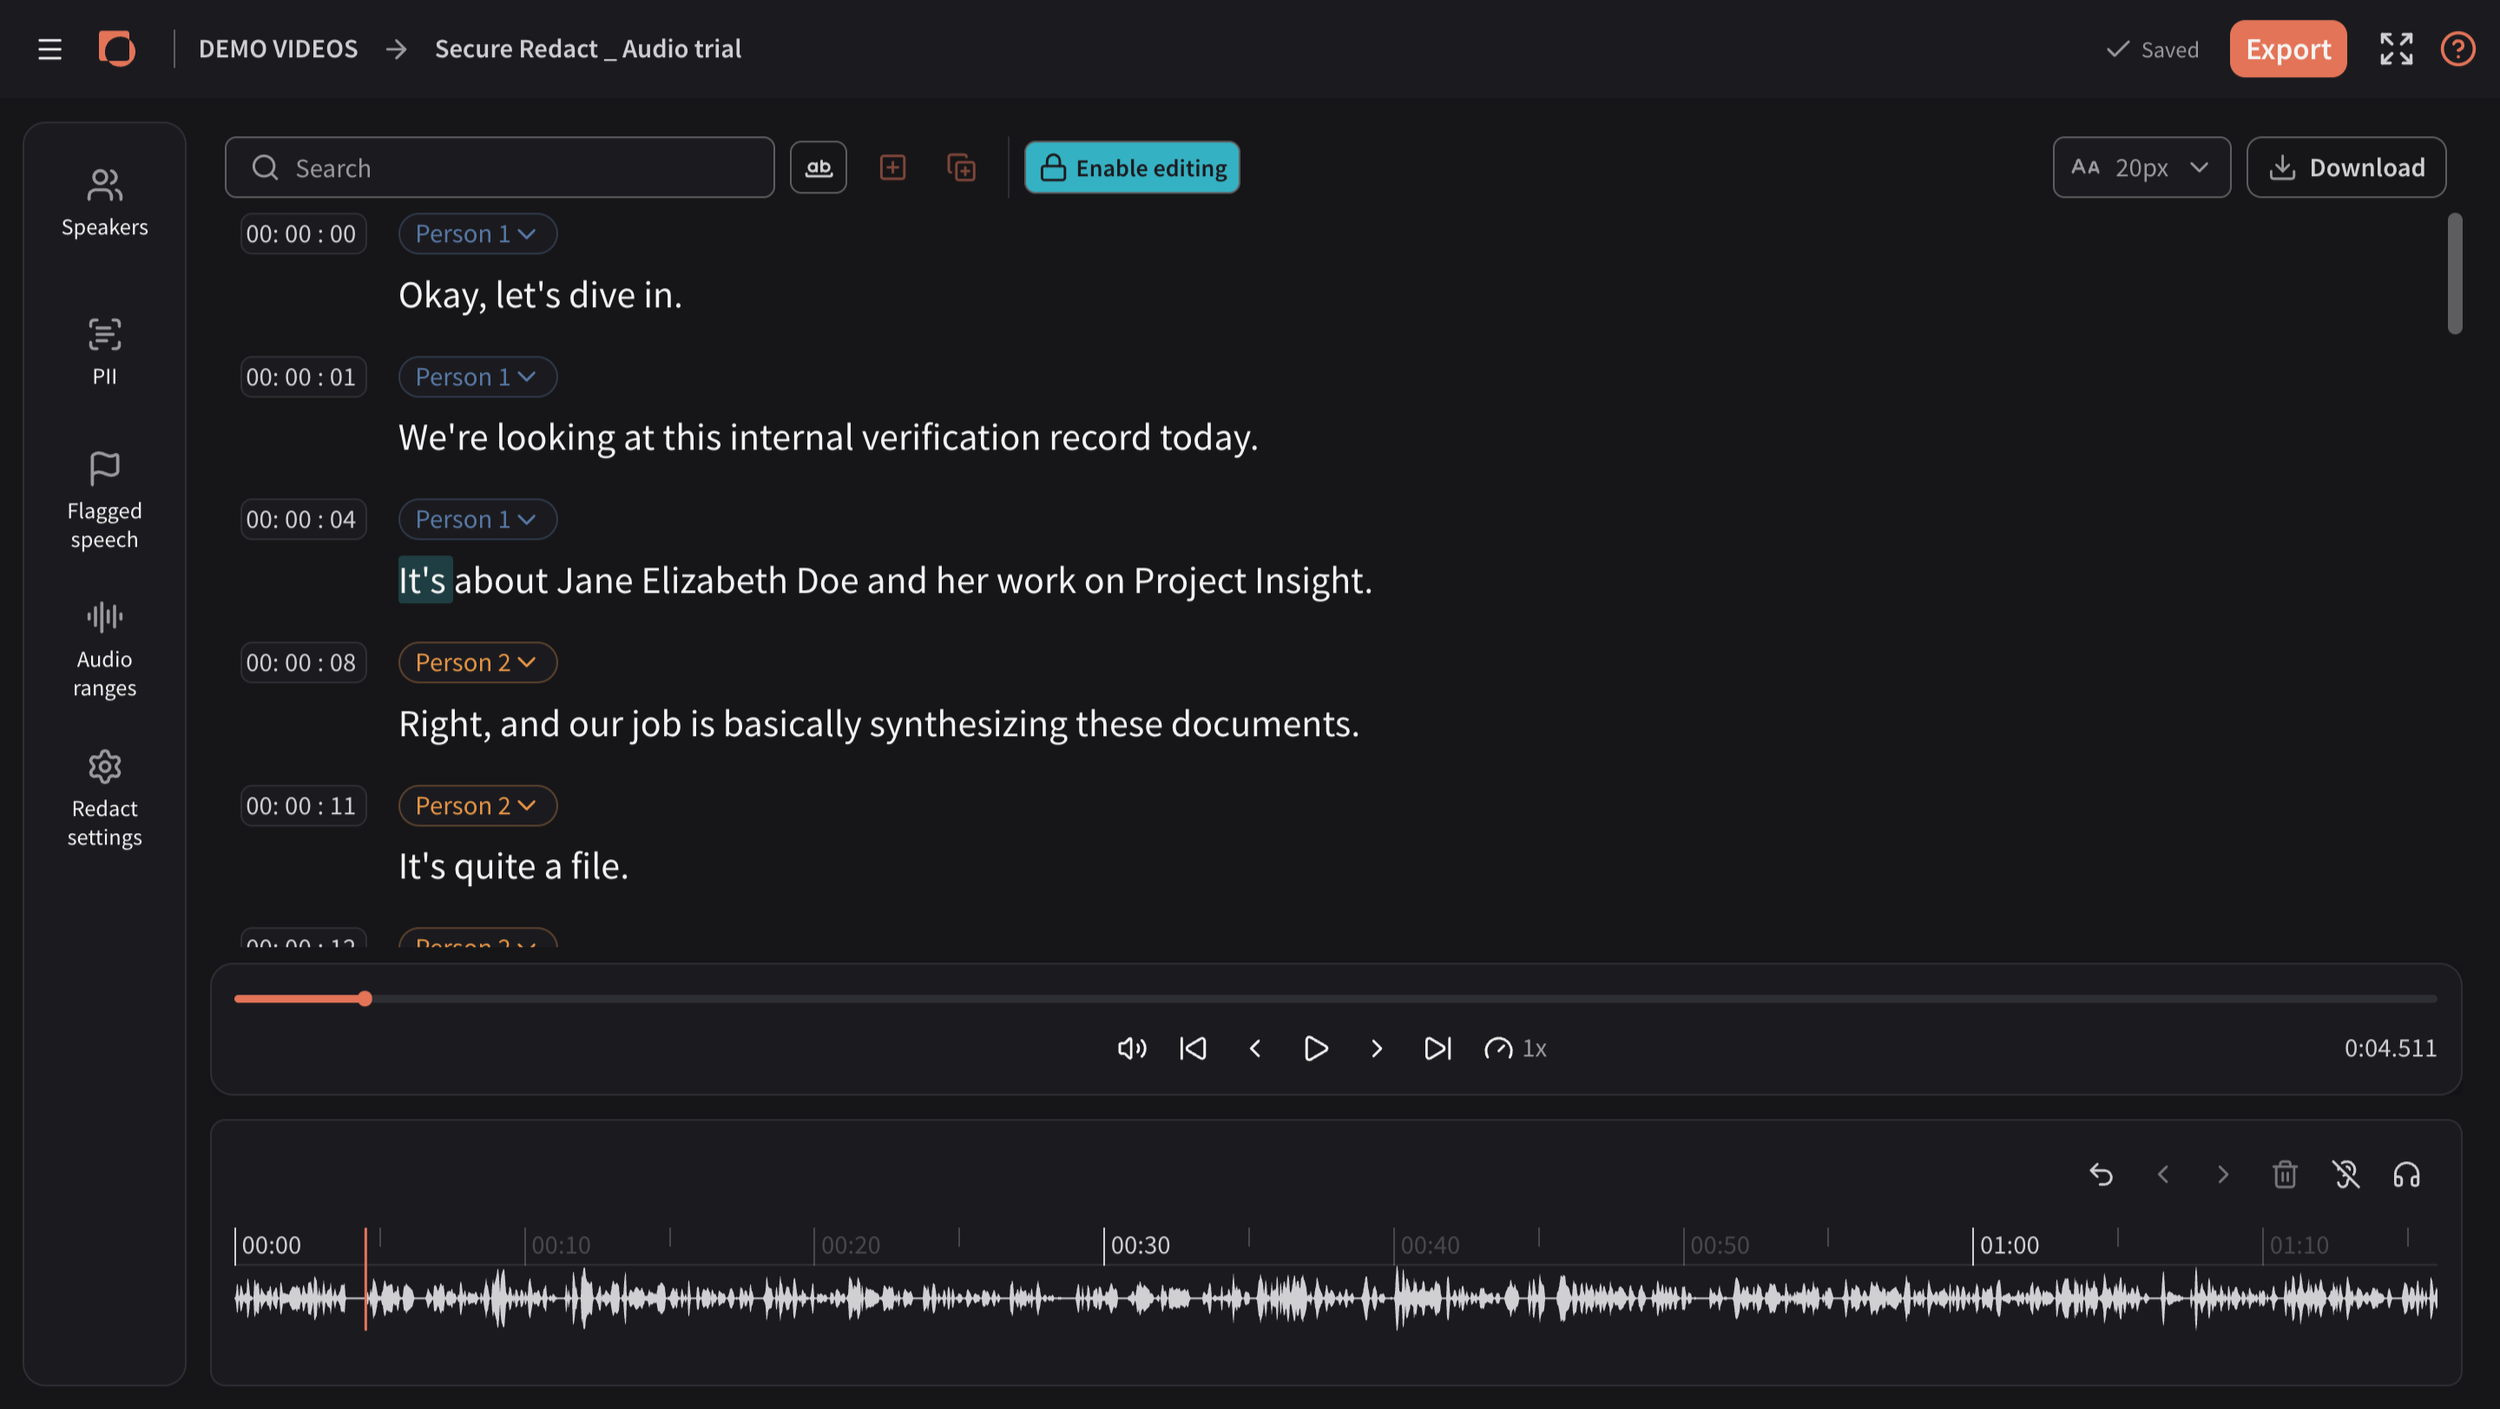
Transcript Editing Features
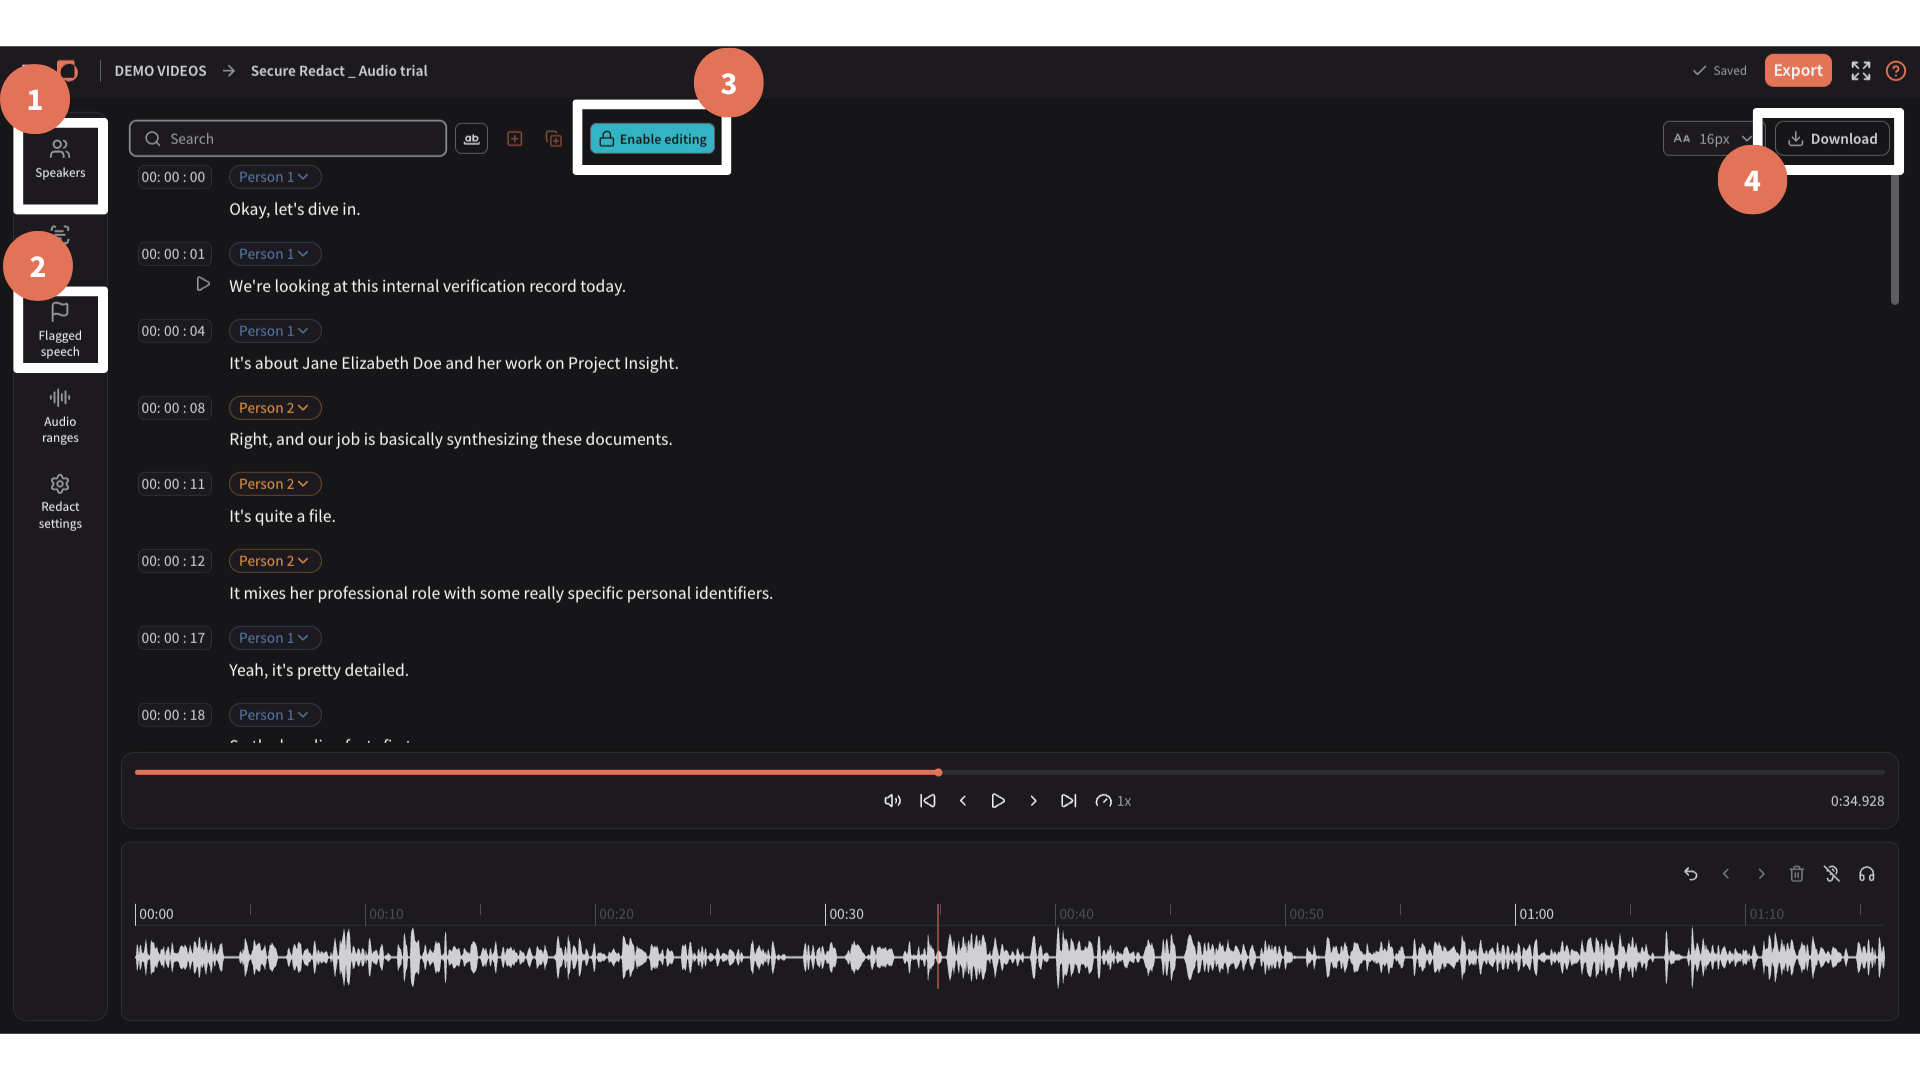
Once the transcript has been auto-generated, you'll have access to a few key features:
Speakers: text is automatically assigned to the relevant speaker.
Flagged speech: any speech the system is unsure about is flagged in this tab for review.
Editing: make manual edits to the transcript.
Download: export the transcript.
For more detail on how to use these features, visit the Audio Transcription page.
Redact audio and matching text in the Transcript
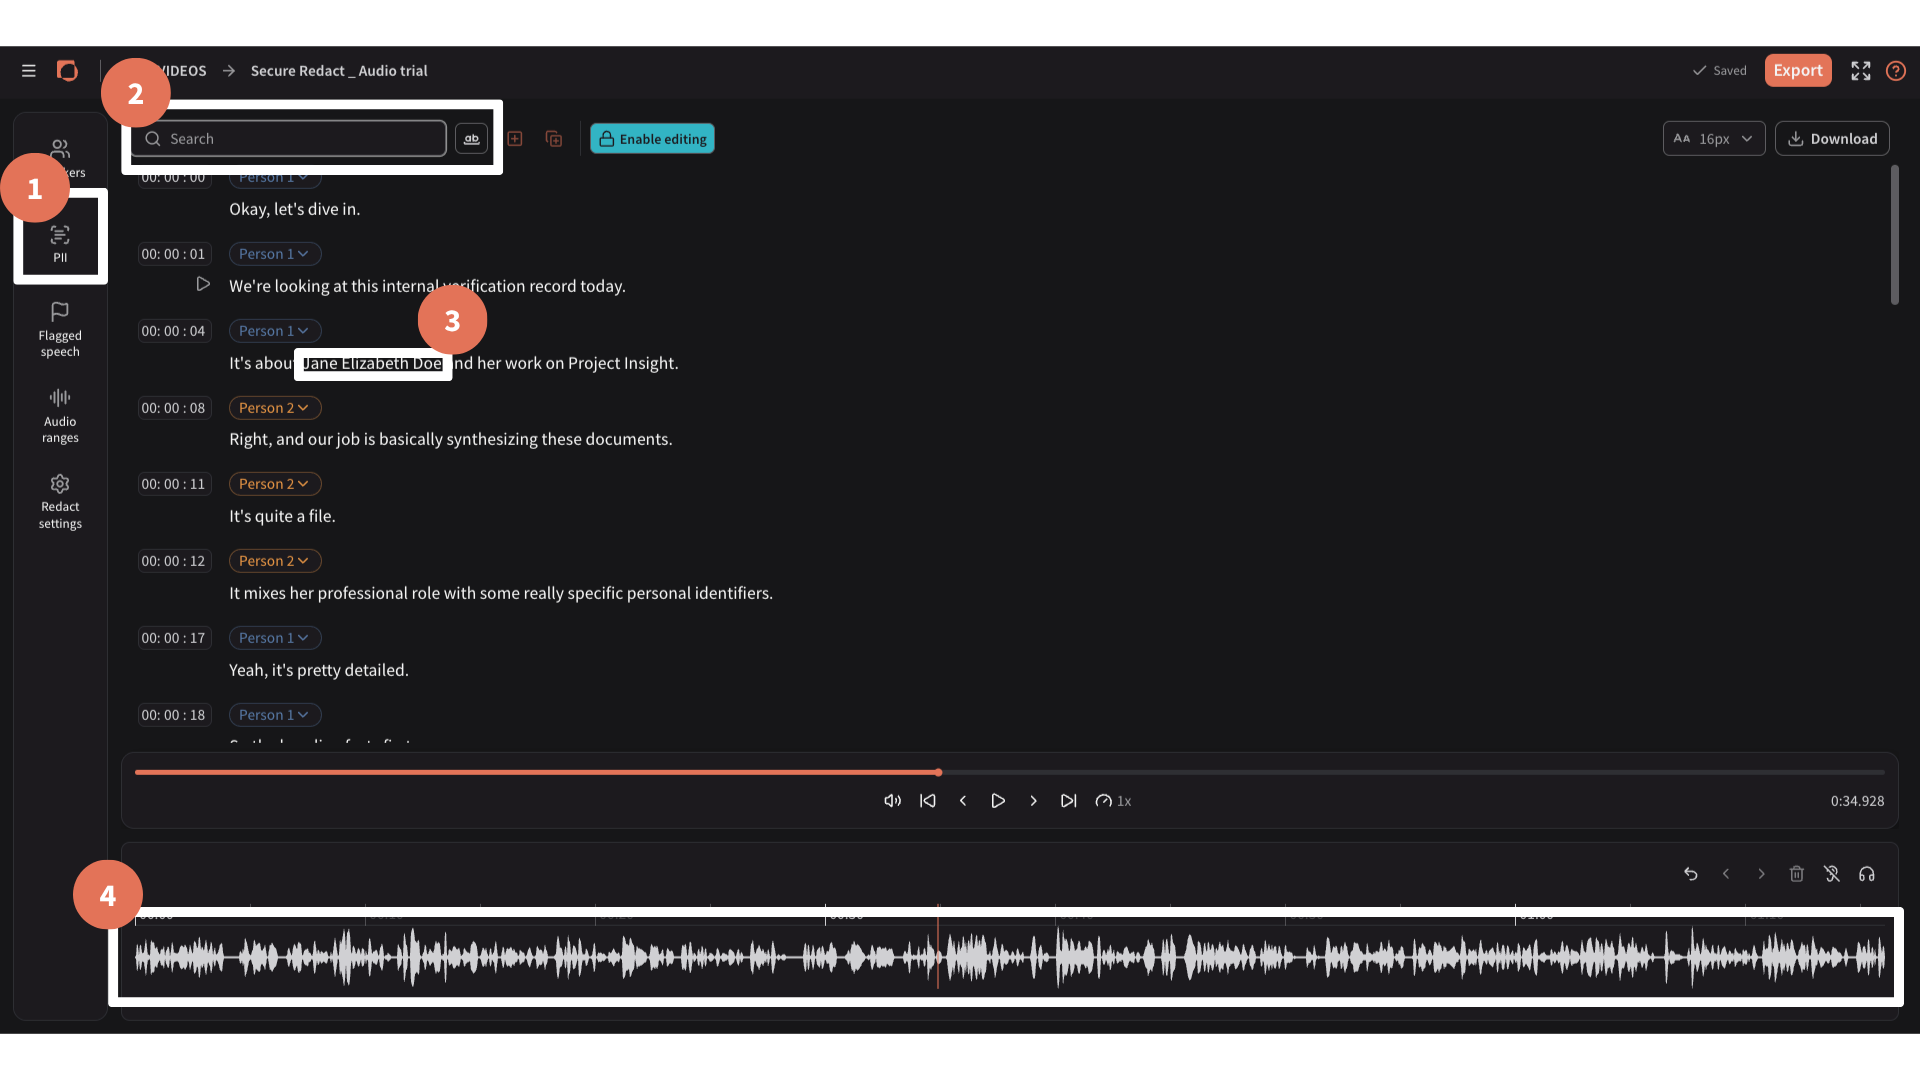
You can redact audio in 4 different ways:
Through our auto-detection of PII (via PII, right).
By searching for specific terms (via the Search bar).
By clicking on particular words/phrases in the Transcript.
By clicking to create audio ranges in the audio waveform or via the Audio ranges tab (right).
See below for more information.
Auto-detected PII
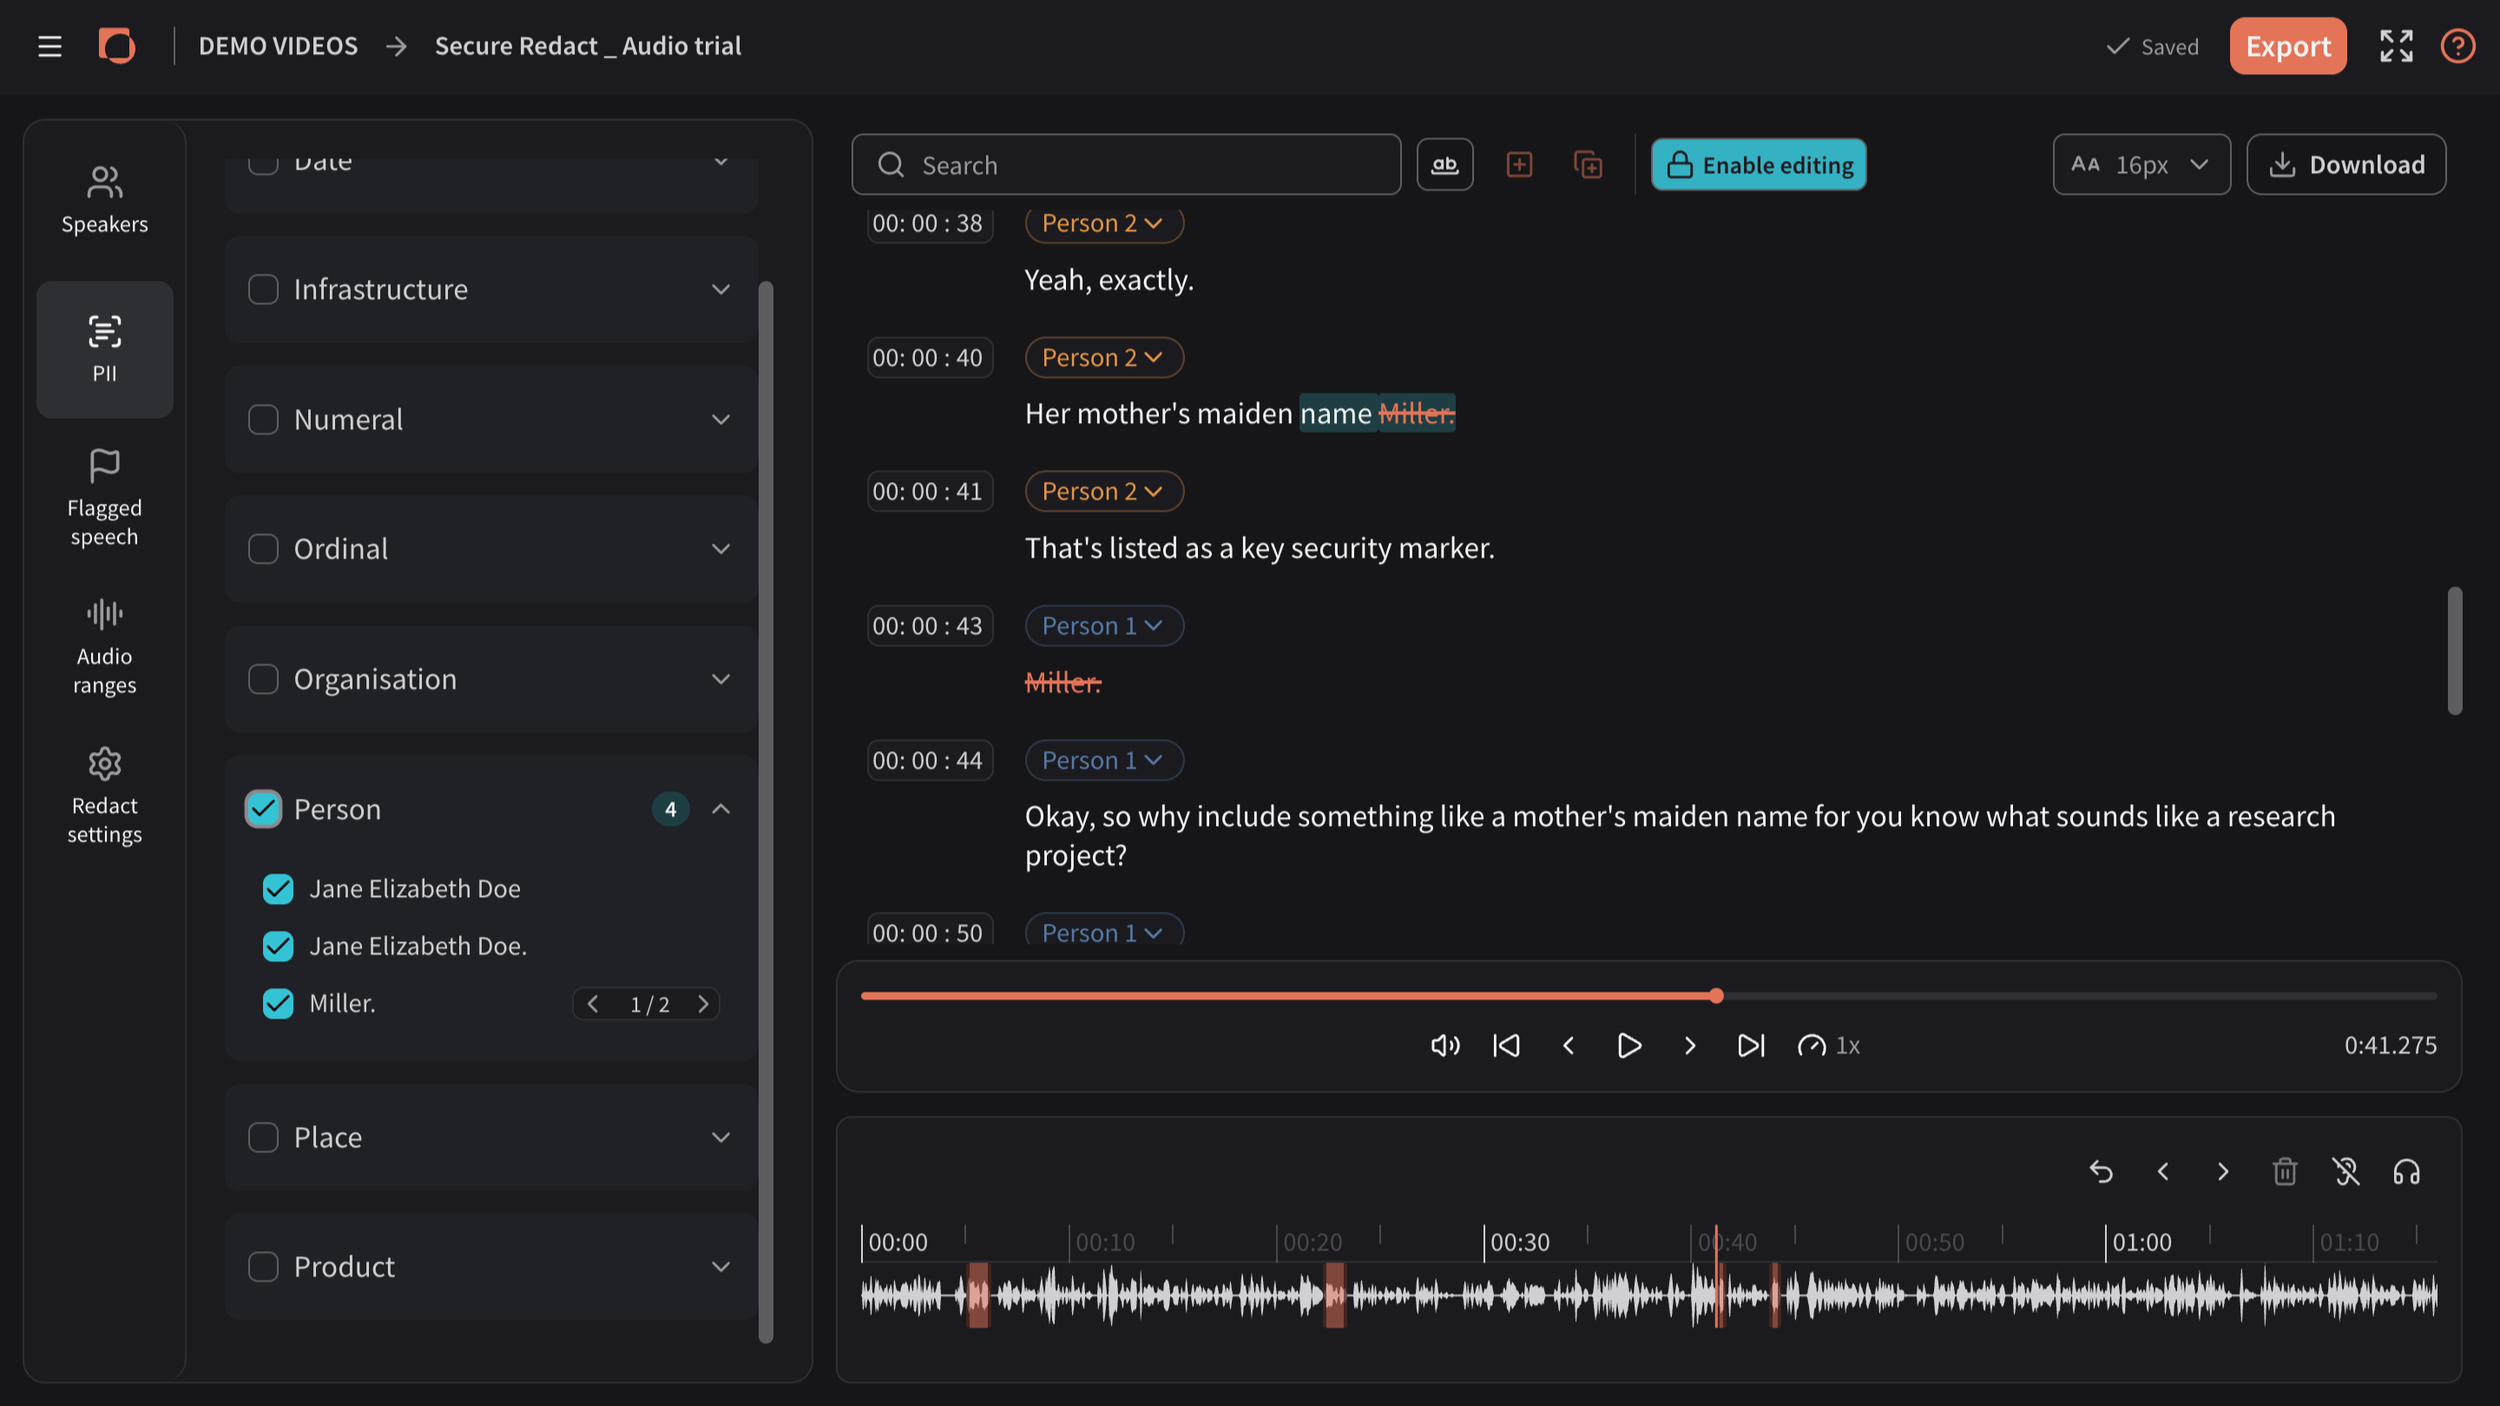
Click PII, left-menu.
Browse the detected PII categories (e.g. "Person", "Date", etc.).
Use the checkbox to select all detected PII within a category, or select individual instances within a category.
The associated text will appear redacted in the Transcript, and a corresponding audio range will be created on the waveform (shown as orange bars).
Untick PII to unredact it and keep it audible/visible in the transcript.
Search for specific terms/phrases
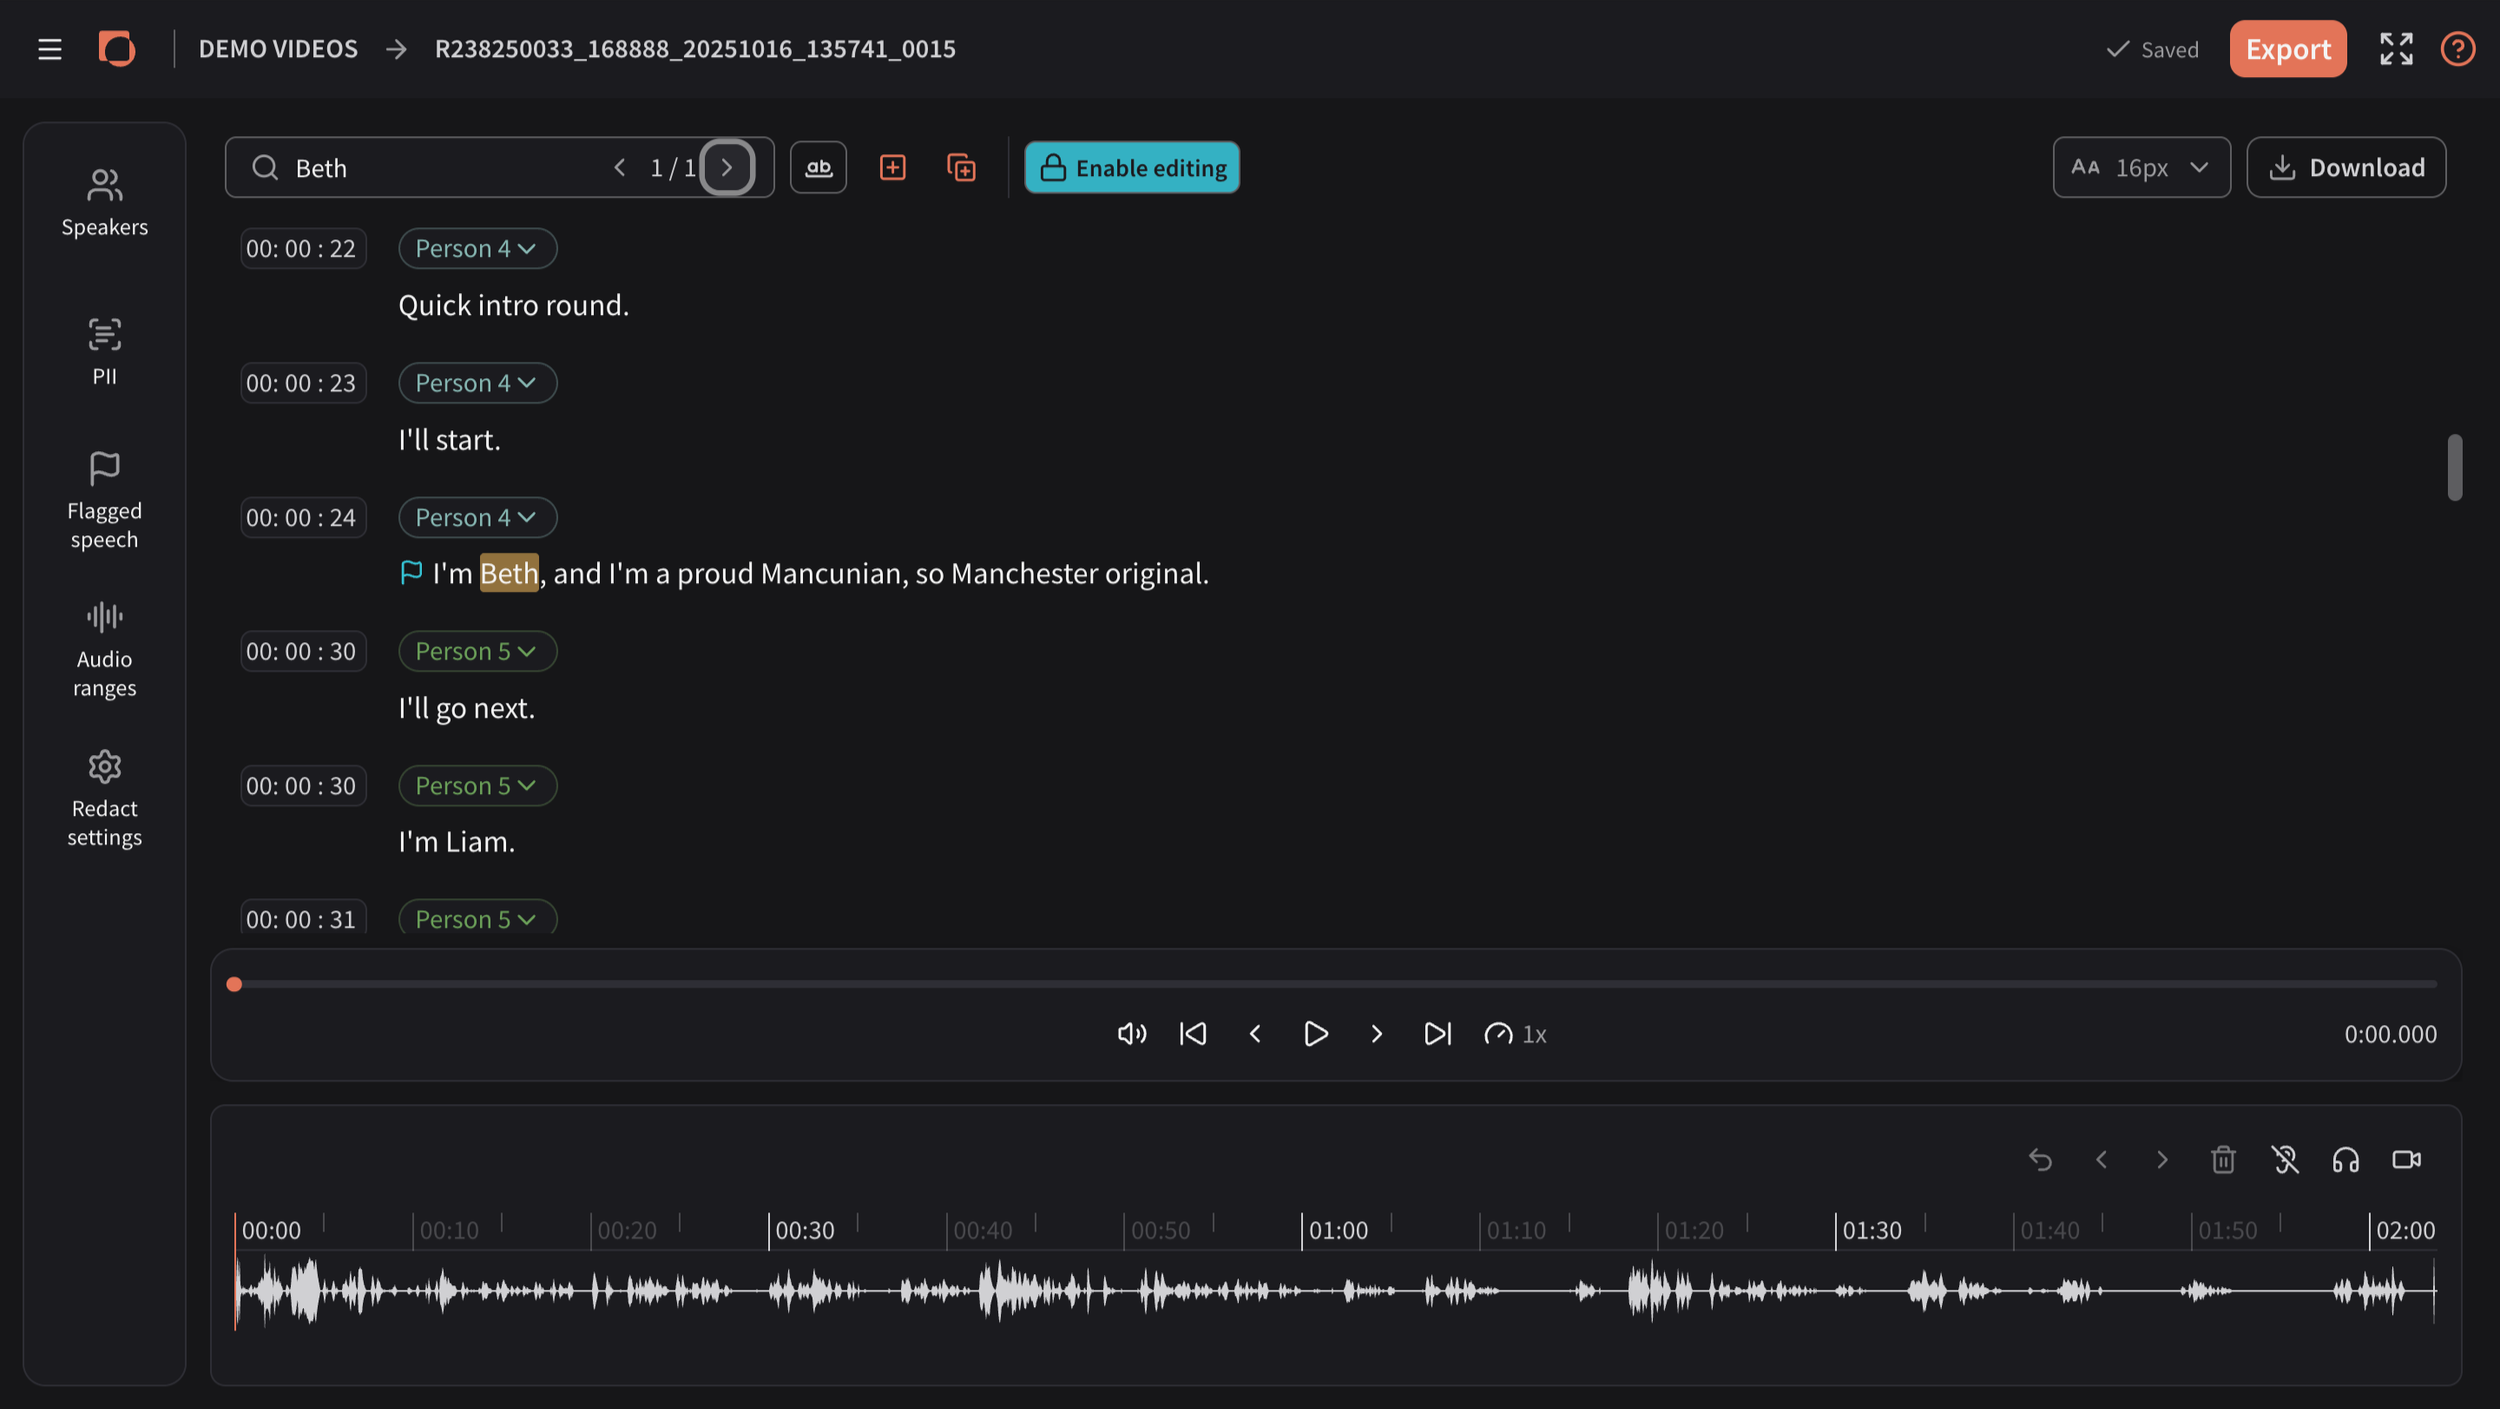
Click the Search bar at the top of the transcript.
Type in a word or phrase, then use the arrows to browse through all instances of it.
Use the button to the right of the Search bar to match that specific word or phrase exactly.
Orange + button: redacts the currently highlighted result.
Multiple boxes with + button: redacts all found instances at once.
Alternatively, double-click a word and click Redact.
Click specific words or phrases in the Transcript
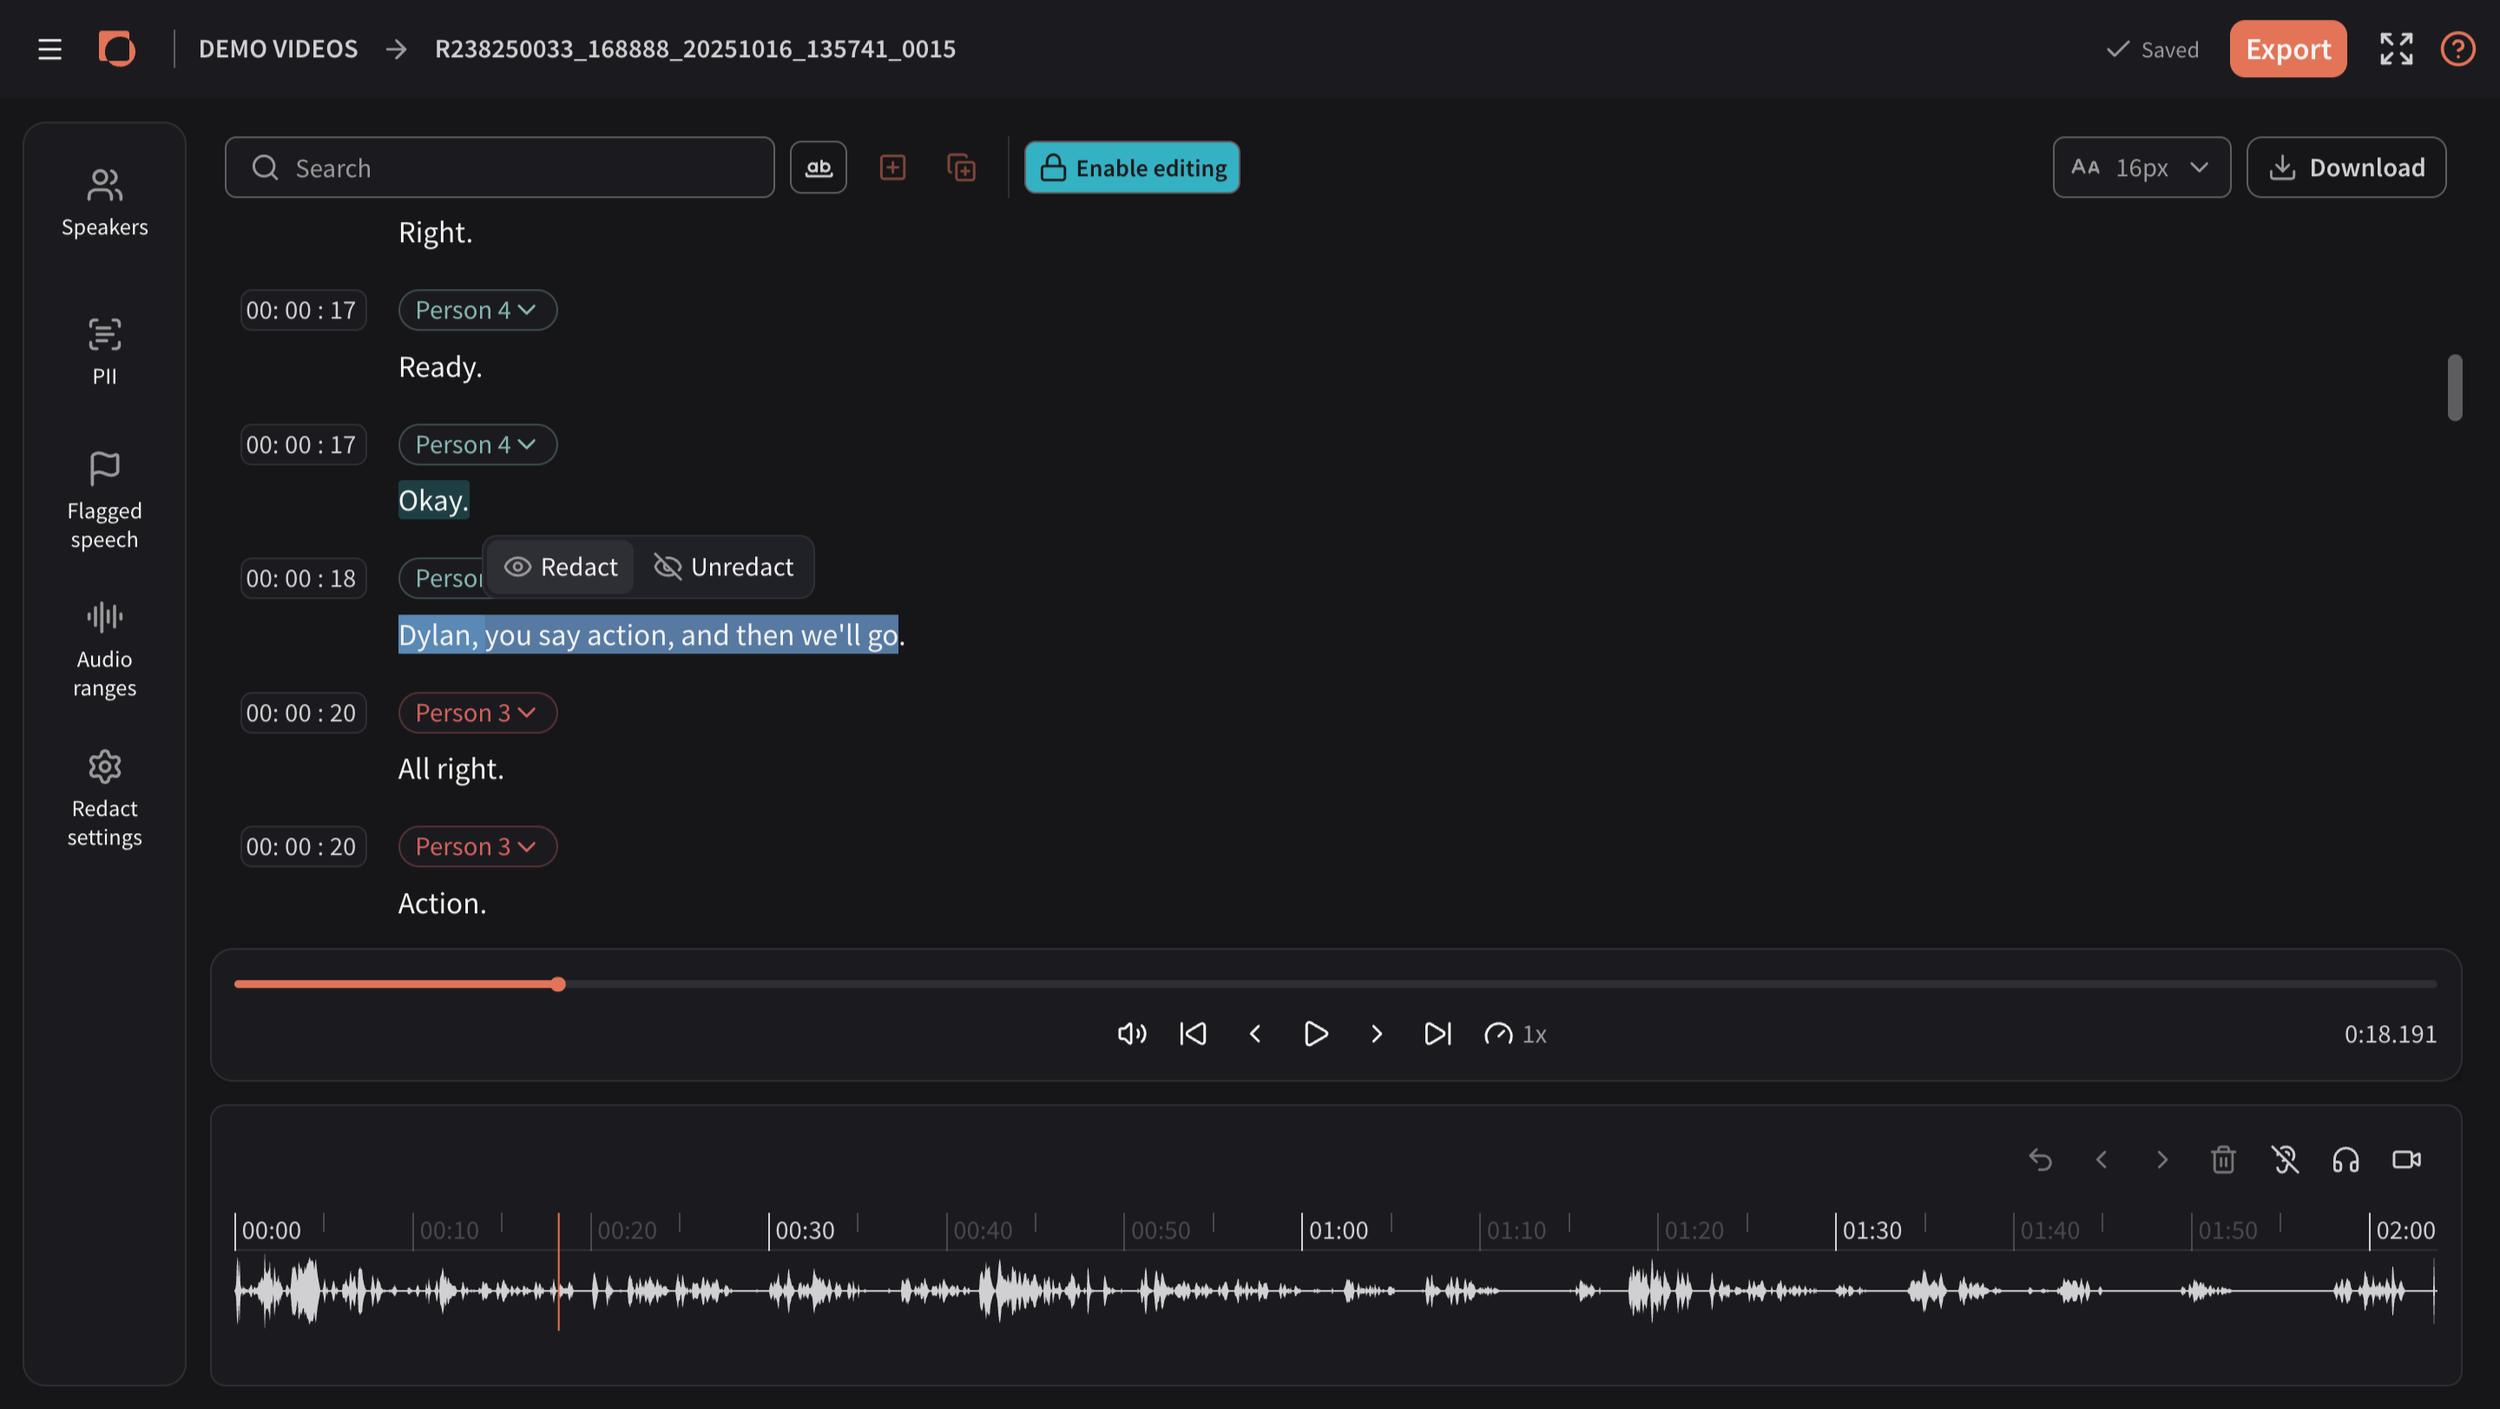
Click and drag over a particular word or phrase.
Click Redact.
The associated text will appear redacted in the Transcript, and a corresponding audio range will be created on the waveform (shown as orange bars).
Audio ranges and the Audio waveform
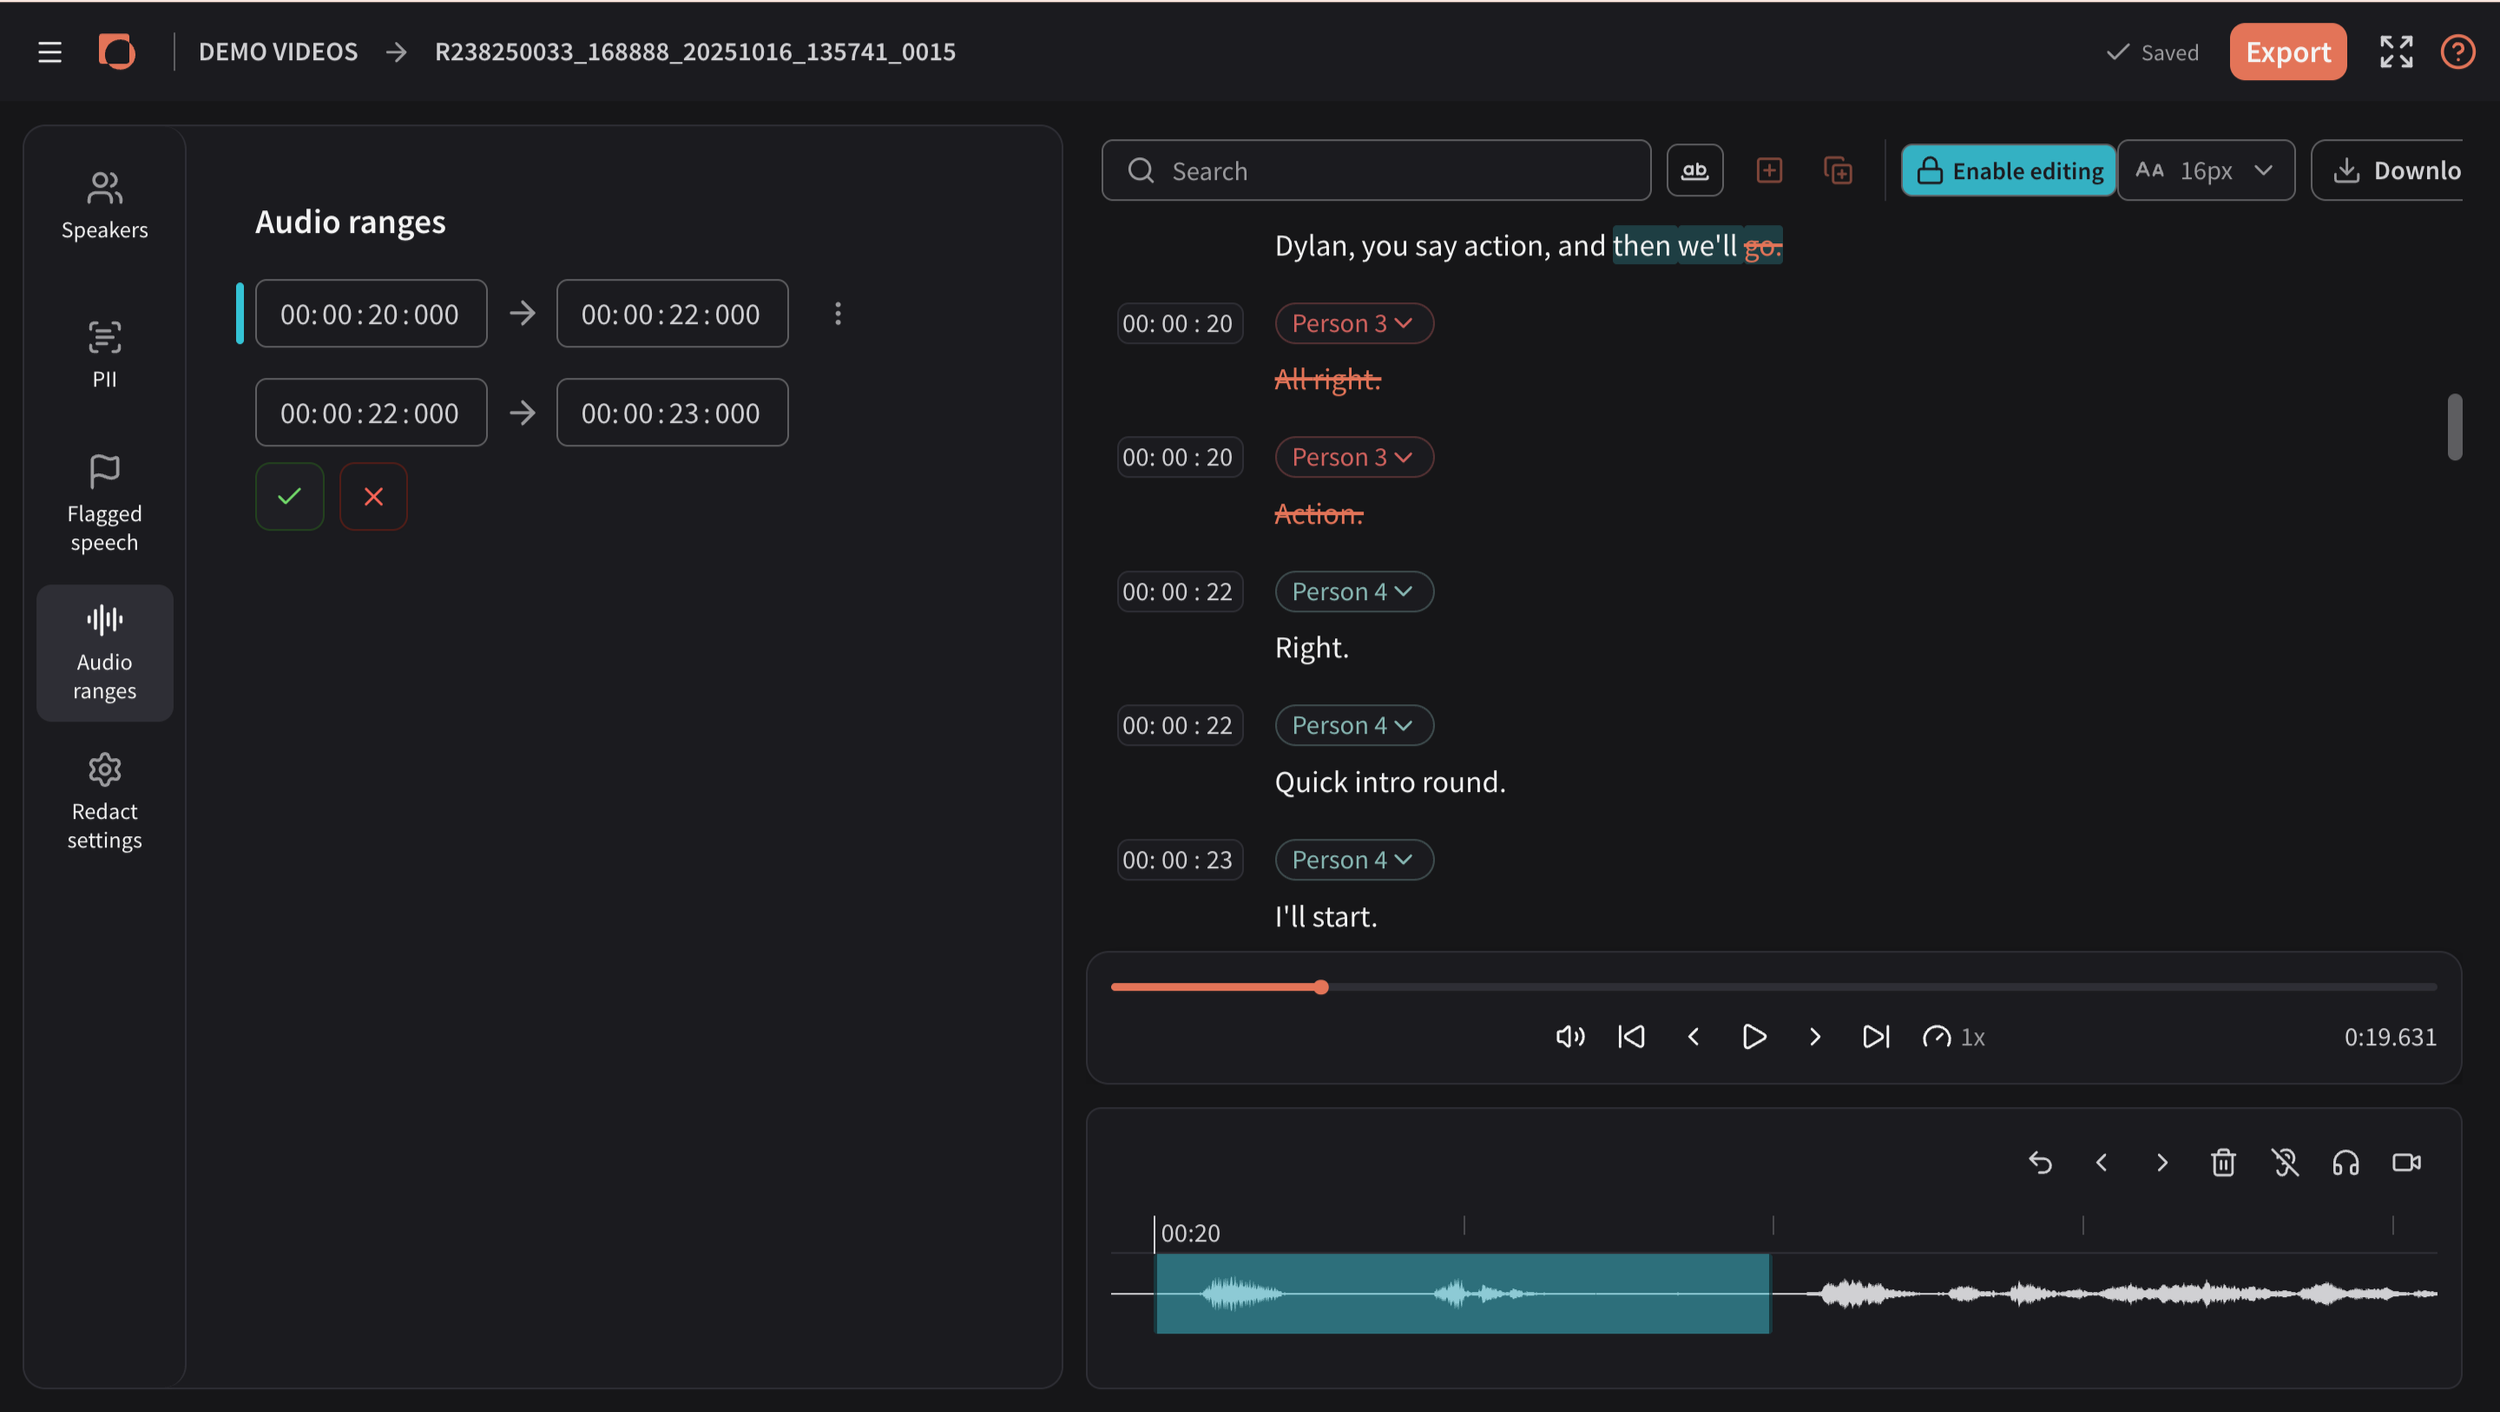
Click Audio ranges, left-menu.
Click Add.
Adjust the time to create an audio range that redacts that particular time frame.
Click tick.
To add an audio range directly on the audio waveform, simply click and drag across the waveform. The corresponding text will also be redacted.
Click, hold and move any orange bar on the waveform to adjust its position. You can also click and drag the Audio range ends to make them longer or shorter.
Redact settings
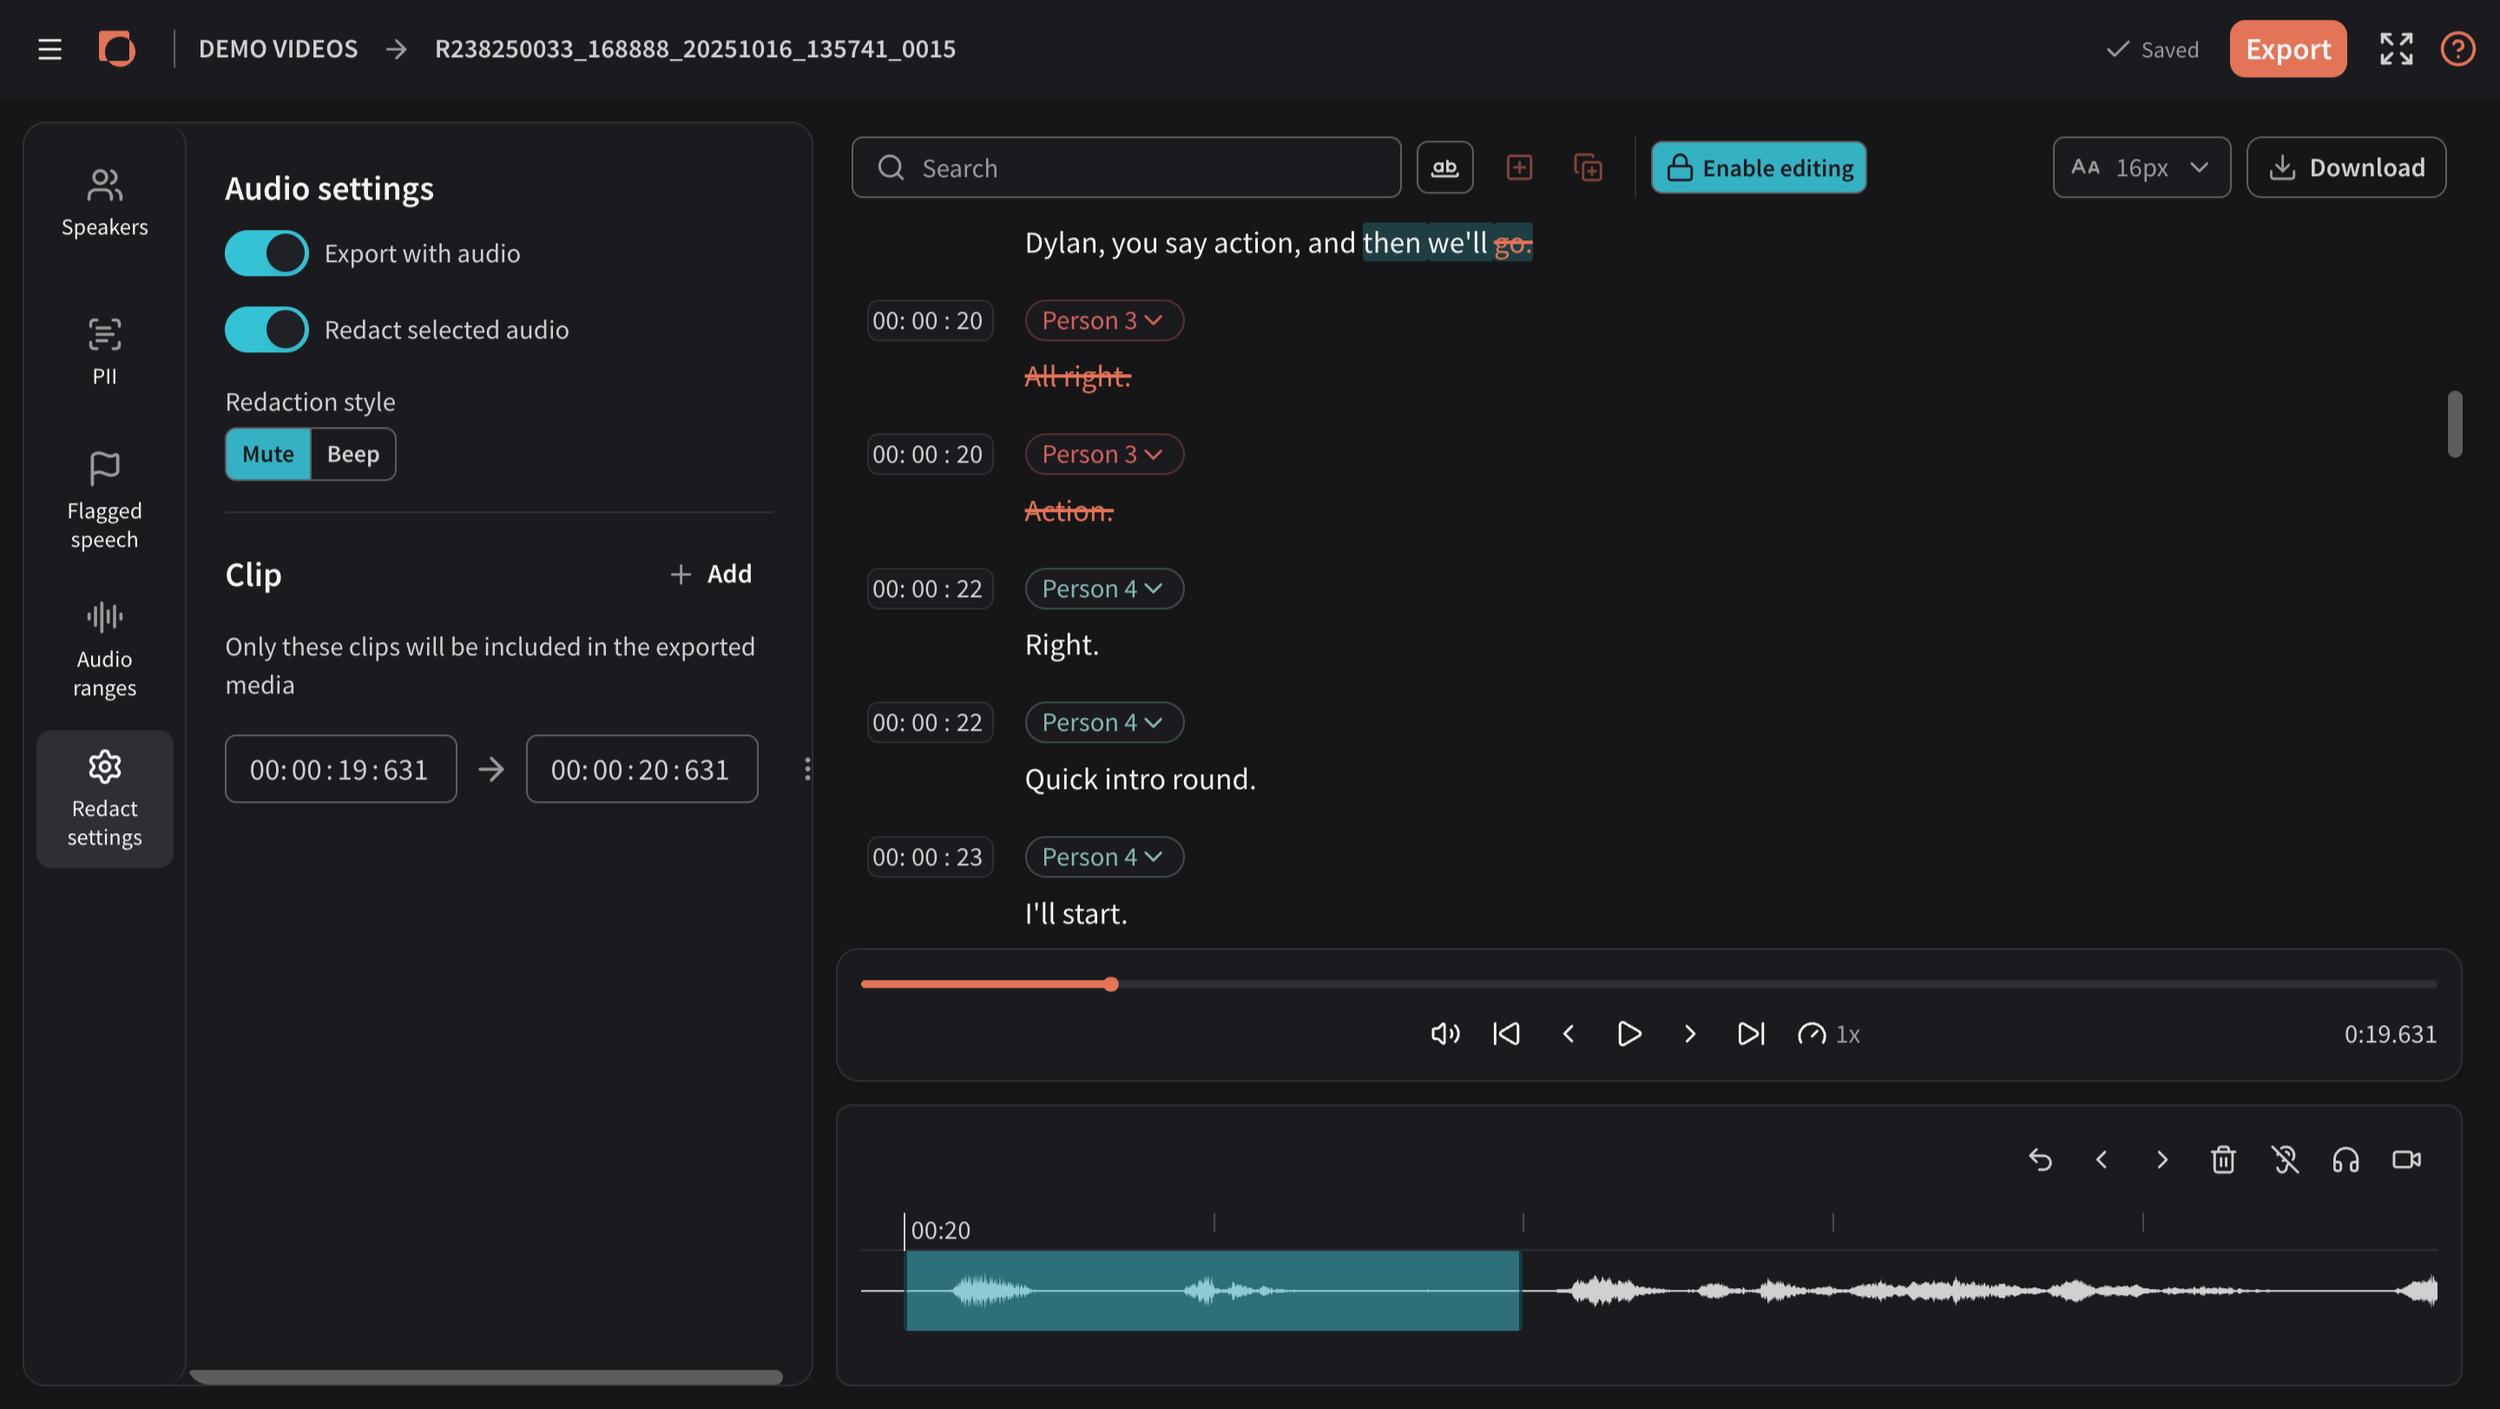
Use the Redact settings (left-menu) to prep your audio file for Export.
Click Redact settings, left-menu.
Choose to export with audio (not selecting this will mean the whole file will be mute).
Choose to redact selected audio (all audio you’ve selected for redaction will be muted in the exported audio).
Choose the style of redaction (either a mute or a beep).
Clip your audio file. NOTE: Only selected clips will be exported.
Then click Export, top-right.
For information on downloading the transcript, visit the Audio Transcription page.
Redacting audio in the Video Editor
If you’d rather redact audio whilst the video is also visible, this is also possible in the Video Editor.
Open the Audio Tab next to the Timeline. Here you can see a waveform of the audio in your video/audio file. Use Audio ranges and the audio waveform in the same way as outlined above.
Open the Transcript in the Transcript Panel (right) to use all the same redact and edit features for the Transcript. This includes:
Auto-detect PII function (how-to is above).
Transcript editing features (more information on the Audio Transcription page).
Searching specific words/phrases (how-to is above).
Clicking specific words/phrases (how-to is above).
Also in the Audio Timeline
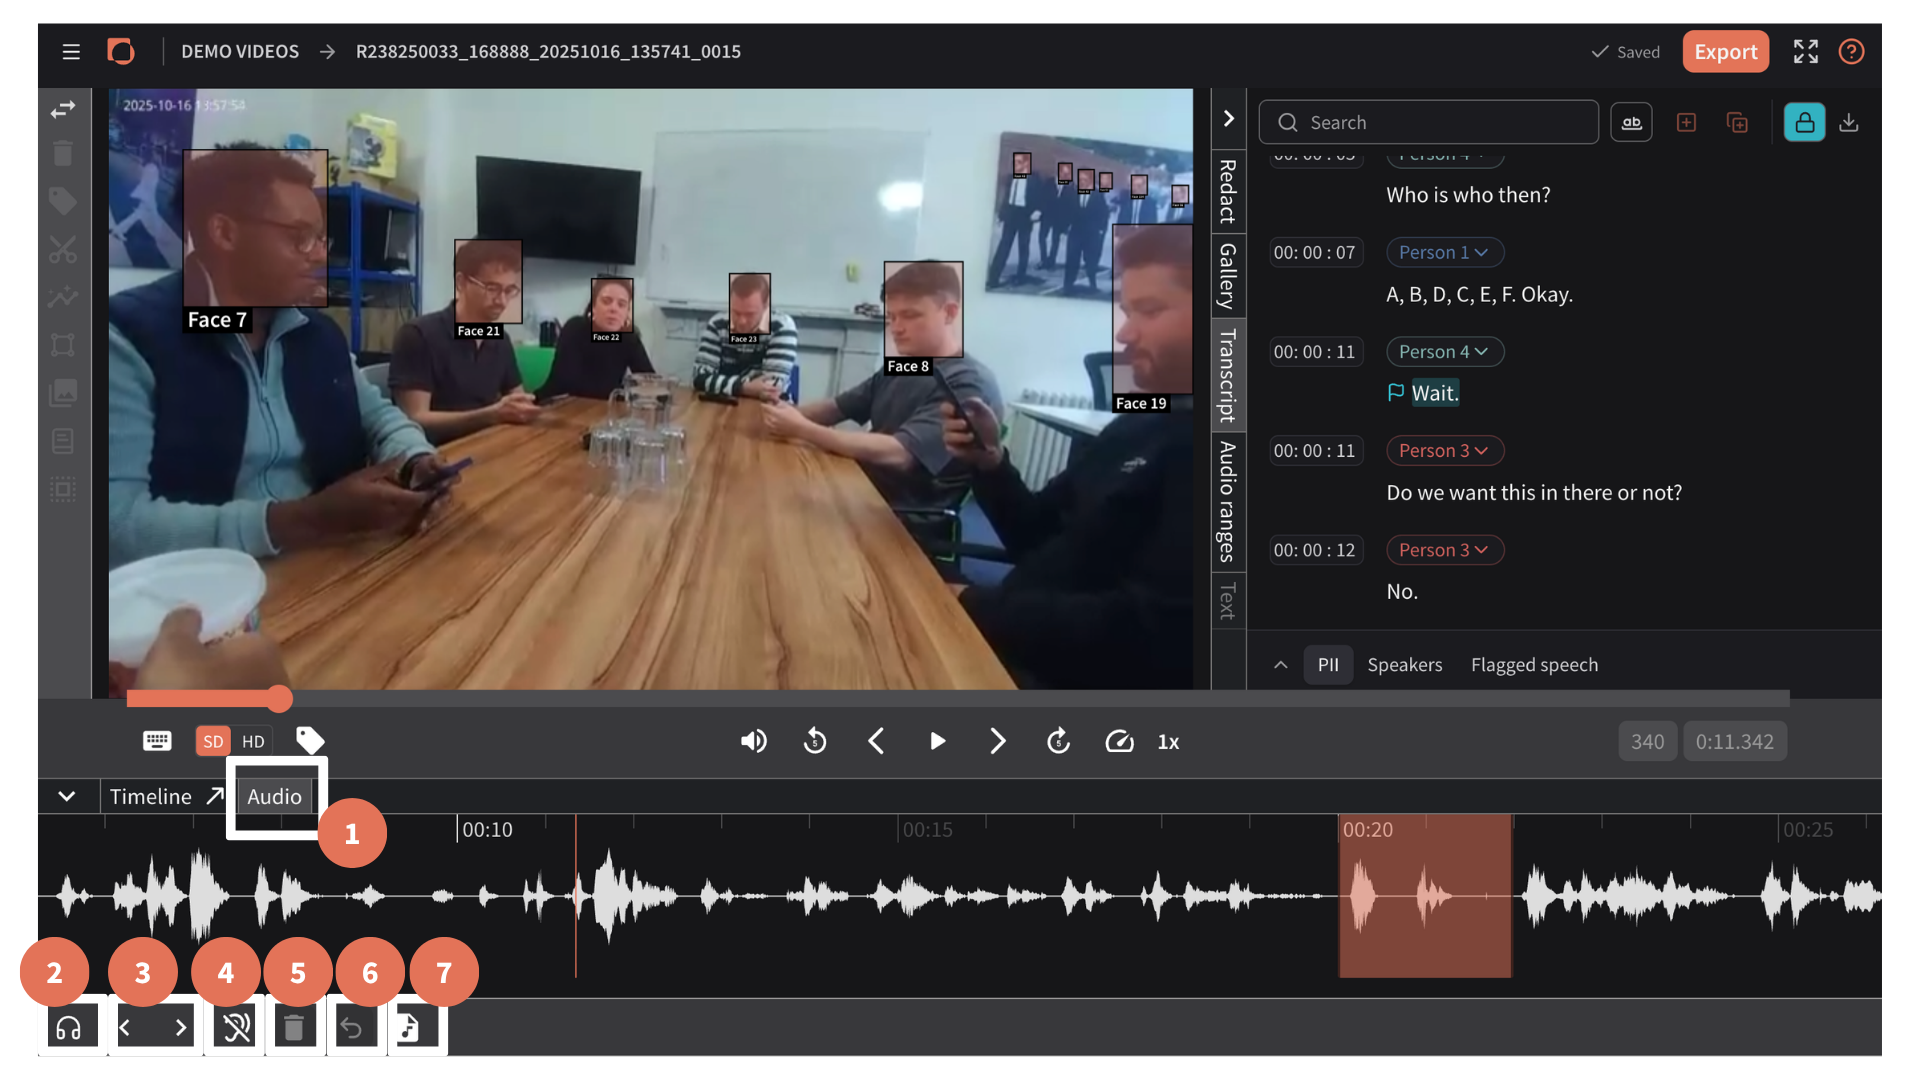
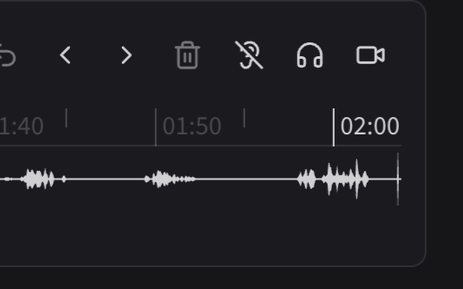
Audio Timeline - view the audio waveform here and access the below features.
Review redacted audio (Headphones button) - preview your audio redaction. It will invert the audio, so that whilst you watch the video/listen to the audio file, you will only hear the selected Audio ranges and the rest of the video will be mute. This is extremely useful for ensuring that all parts of the audio that you need are fully selected for redaction. Keyboard shortcut: A
Arrows - go to skip to the start/end of Audio ranges.
Redact audio - to start/stop an Audio range. Keyboard shortcut: G
Delete - to delete an Audio range (this cannot be undone). Keyboard shortcut: backspace
Undo.
Audio only mode - this temporarily dismisses the visual part of the video, and brings up the Audio Editor, so that you can focus solely on Audio redaction. Click Video mode (Video button in the Audio Timeline) to go back to editing both video/audio at the same time.